Spiced Apple Waffles with Apple Syrup

It’s that time of year when I start dreaming of apple cakes and cookies and breads and buy WAY too many apples. And then I start looking for new ways to use them… and end up finding some fun new recipes.

This year, my brain started wondering about apple waffles. A lot of apple-y baked goods use applesauce, but I didn’t think that’d be the flavor I wanted. I also saw several recipes that use apple cider or molasses for flavoring. But I wanted something with actual pieces of apple in there. When I found this recipe for Spiced Apple Waffles with Apple Syrup, I just knew I had to do it.

These waffles have shredded apple inside, plus syrupy roasted apples on top. They’re really flavorful too, thanks to buttermilk and a perfect blend of fall-ish spices like allspice and cinnamon.

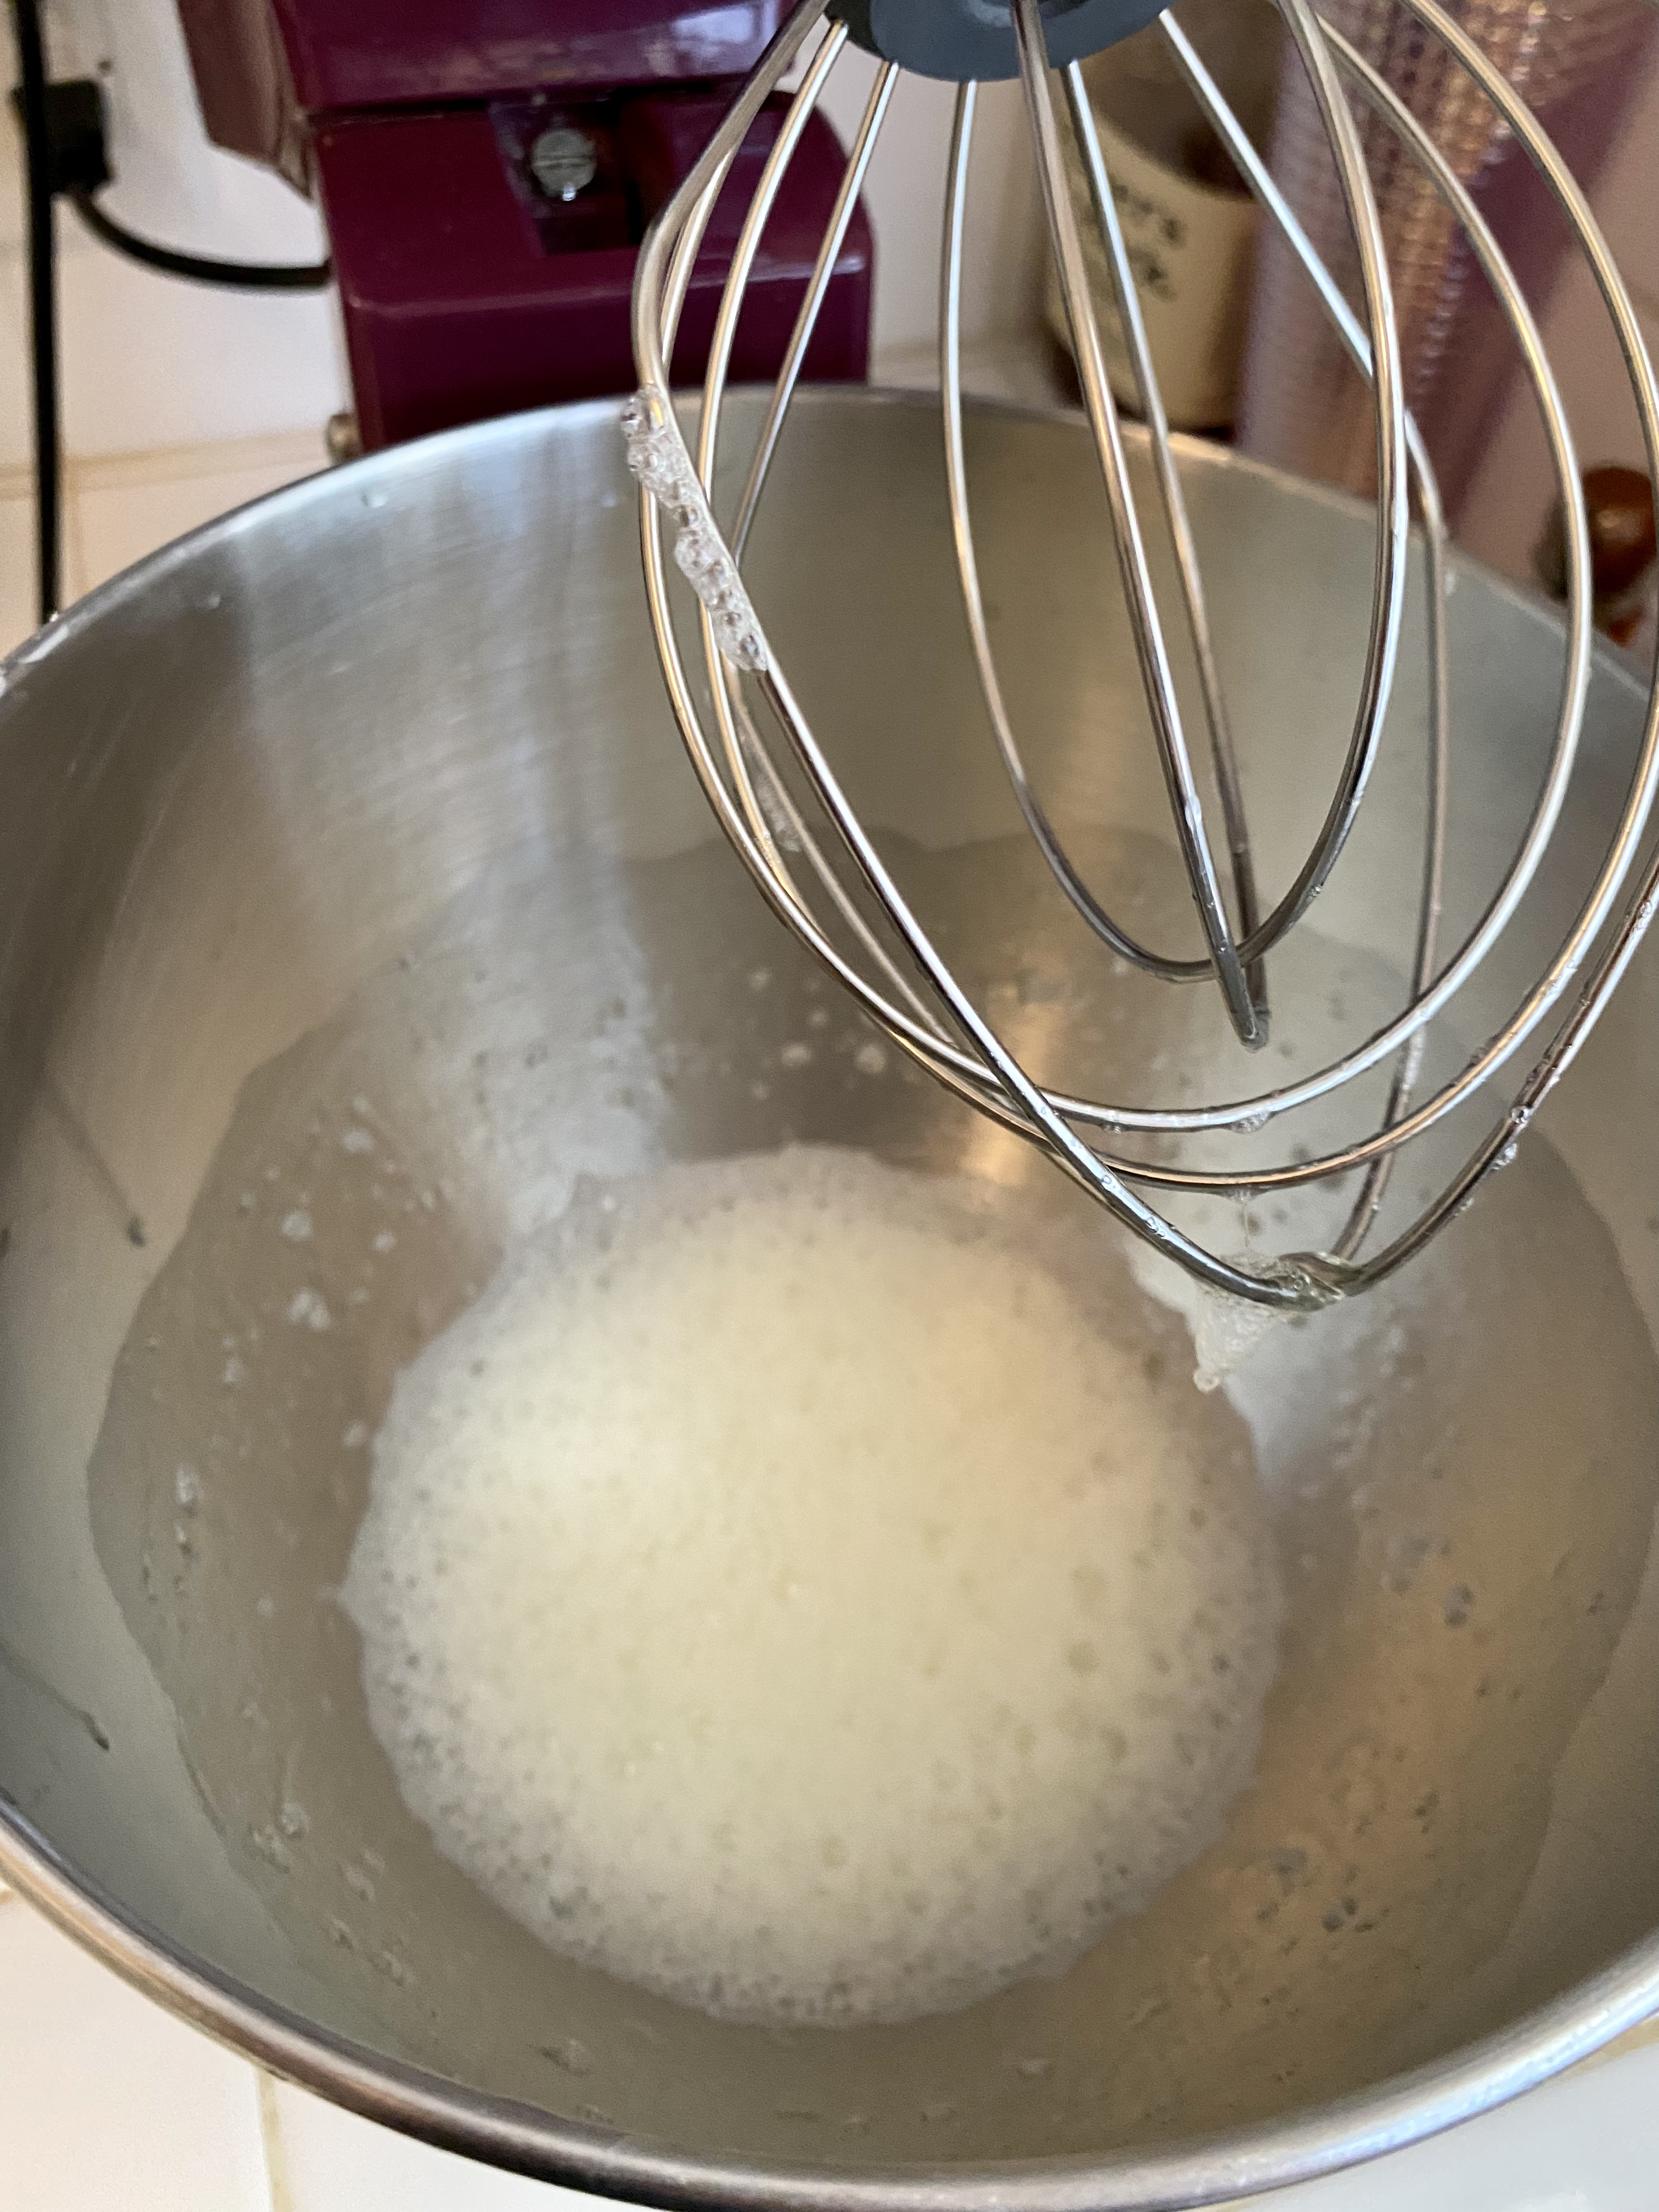
Like many waffle recipes, this one says to beat your egg whites before folding them in. I wouldn’t skip this, as it helps make the batter lighter.

While your waffles cook, you whip up the simple apple syrup. Such a great treat: and definitely on my fall breakfast rotation for years to come.

Spiced Apple Waffles with Apple Syrup

Original recipe: Brooklyn Supper

Yield: Will depend on your iron—I got four rounds of waffles out of mine.

Suggested equipment: Waffle iron, mixer, something to shred your apples (I used my food processor)

Total Time: 30 minutes

Ingredients

For the waffles

  • 4 tbsp butter, melted and cooked
  • 1 3/4 cup flour
  • 2 tsp baking powder
  • 1 tsp baking soda
  • 1 tsp cinnamon
  • 1/4 tsp allspice
  • 1/2 tsp sea salt
  • 4 eggs, separated
  • 1 cup shredded apple (about an apple)
  • 1 cup buttermilk (shaken)
  • 2 tbsp sugar

For the syrup

  •  1 tbsp unsalted butter
  • 2 cups sliced apples (about 3 apples)
  • 1/4 cup sugar
  • 1/2 tsp cinnamon
  • Pinch of sea salt

Instructions

Make your waffles

  1. Melt the butter, then set it aside to cool for a bit
  2. Preheat your waffle iron
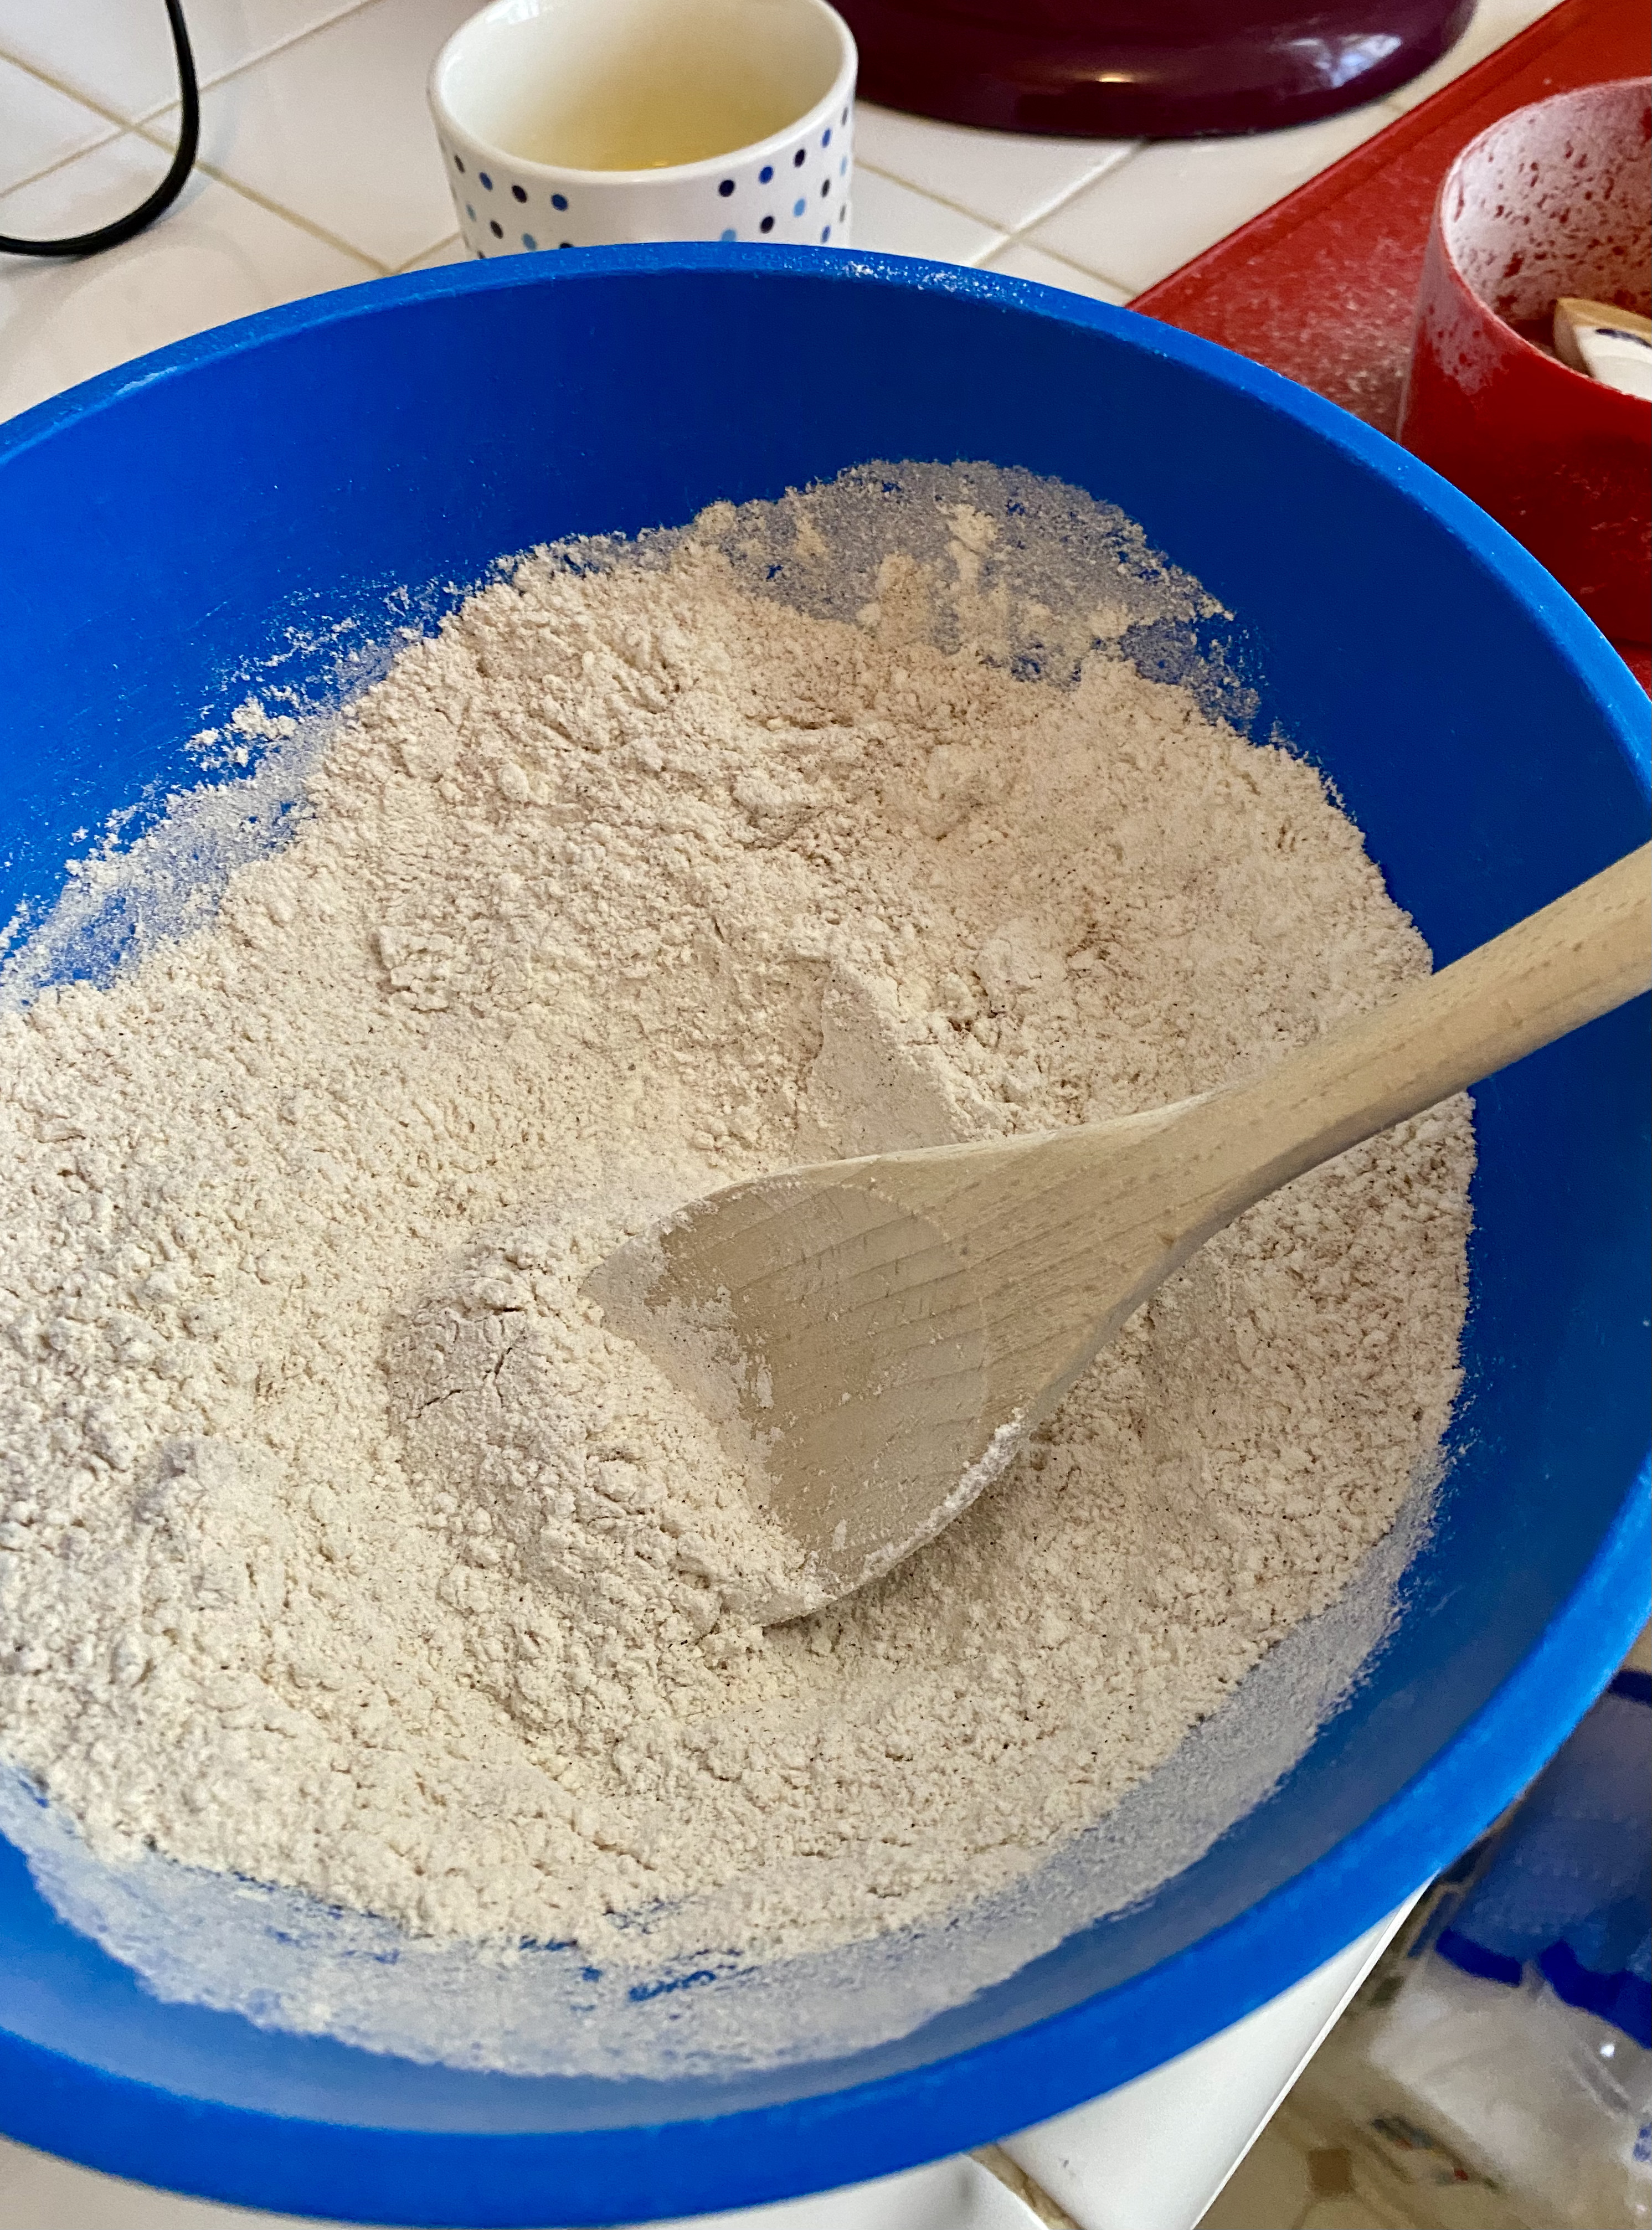
  3. In a large bowl, whisk your flour, baking powder, baking soda, cinnamon, allspice and sea salt
  4. In another bowl, combine the egg yolks, shredded apple, buttermilk and sugar
  5. Fold the wet ingredients into the dry ingredients. Then, fold in the melted butter.
  6. Beat your egg whites to soft peaks—should take about a minute or so
  7. Stir the egg whites into your batter, until just combined
  8. Cook your batter per your waffle iron’s directions. While they cook, start the syrup!

Make your syrup

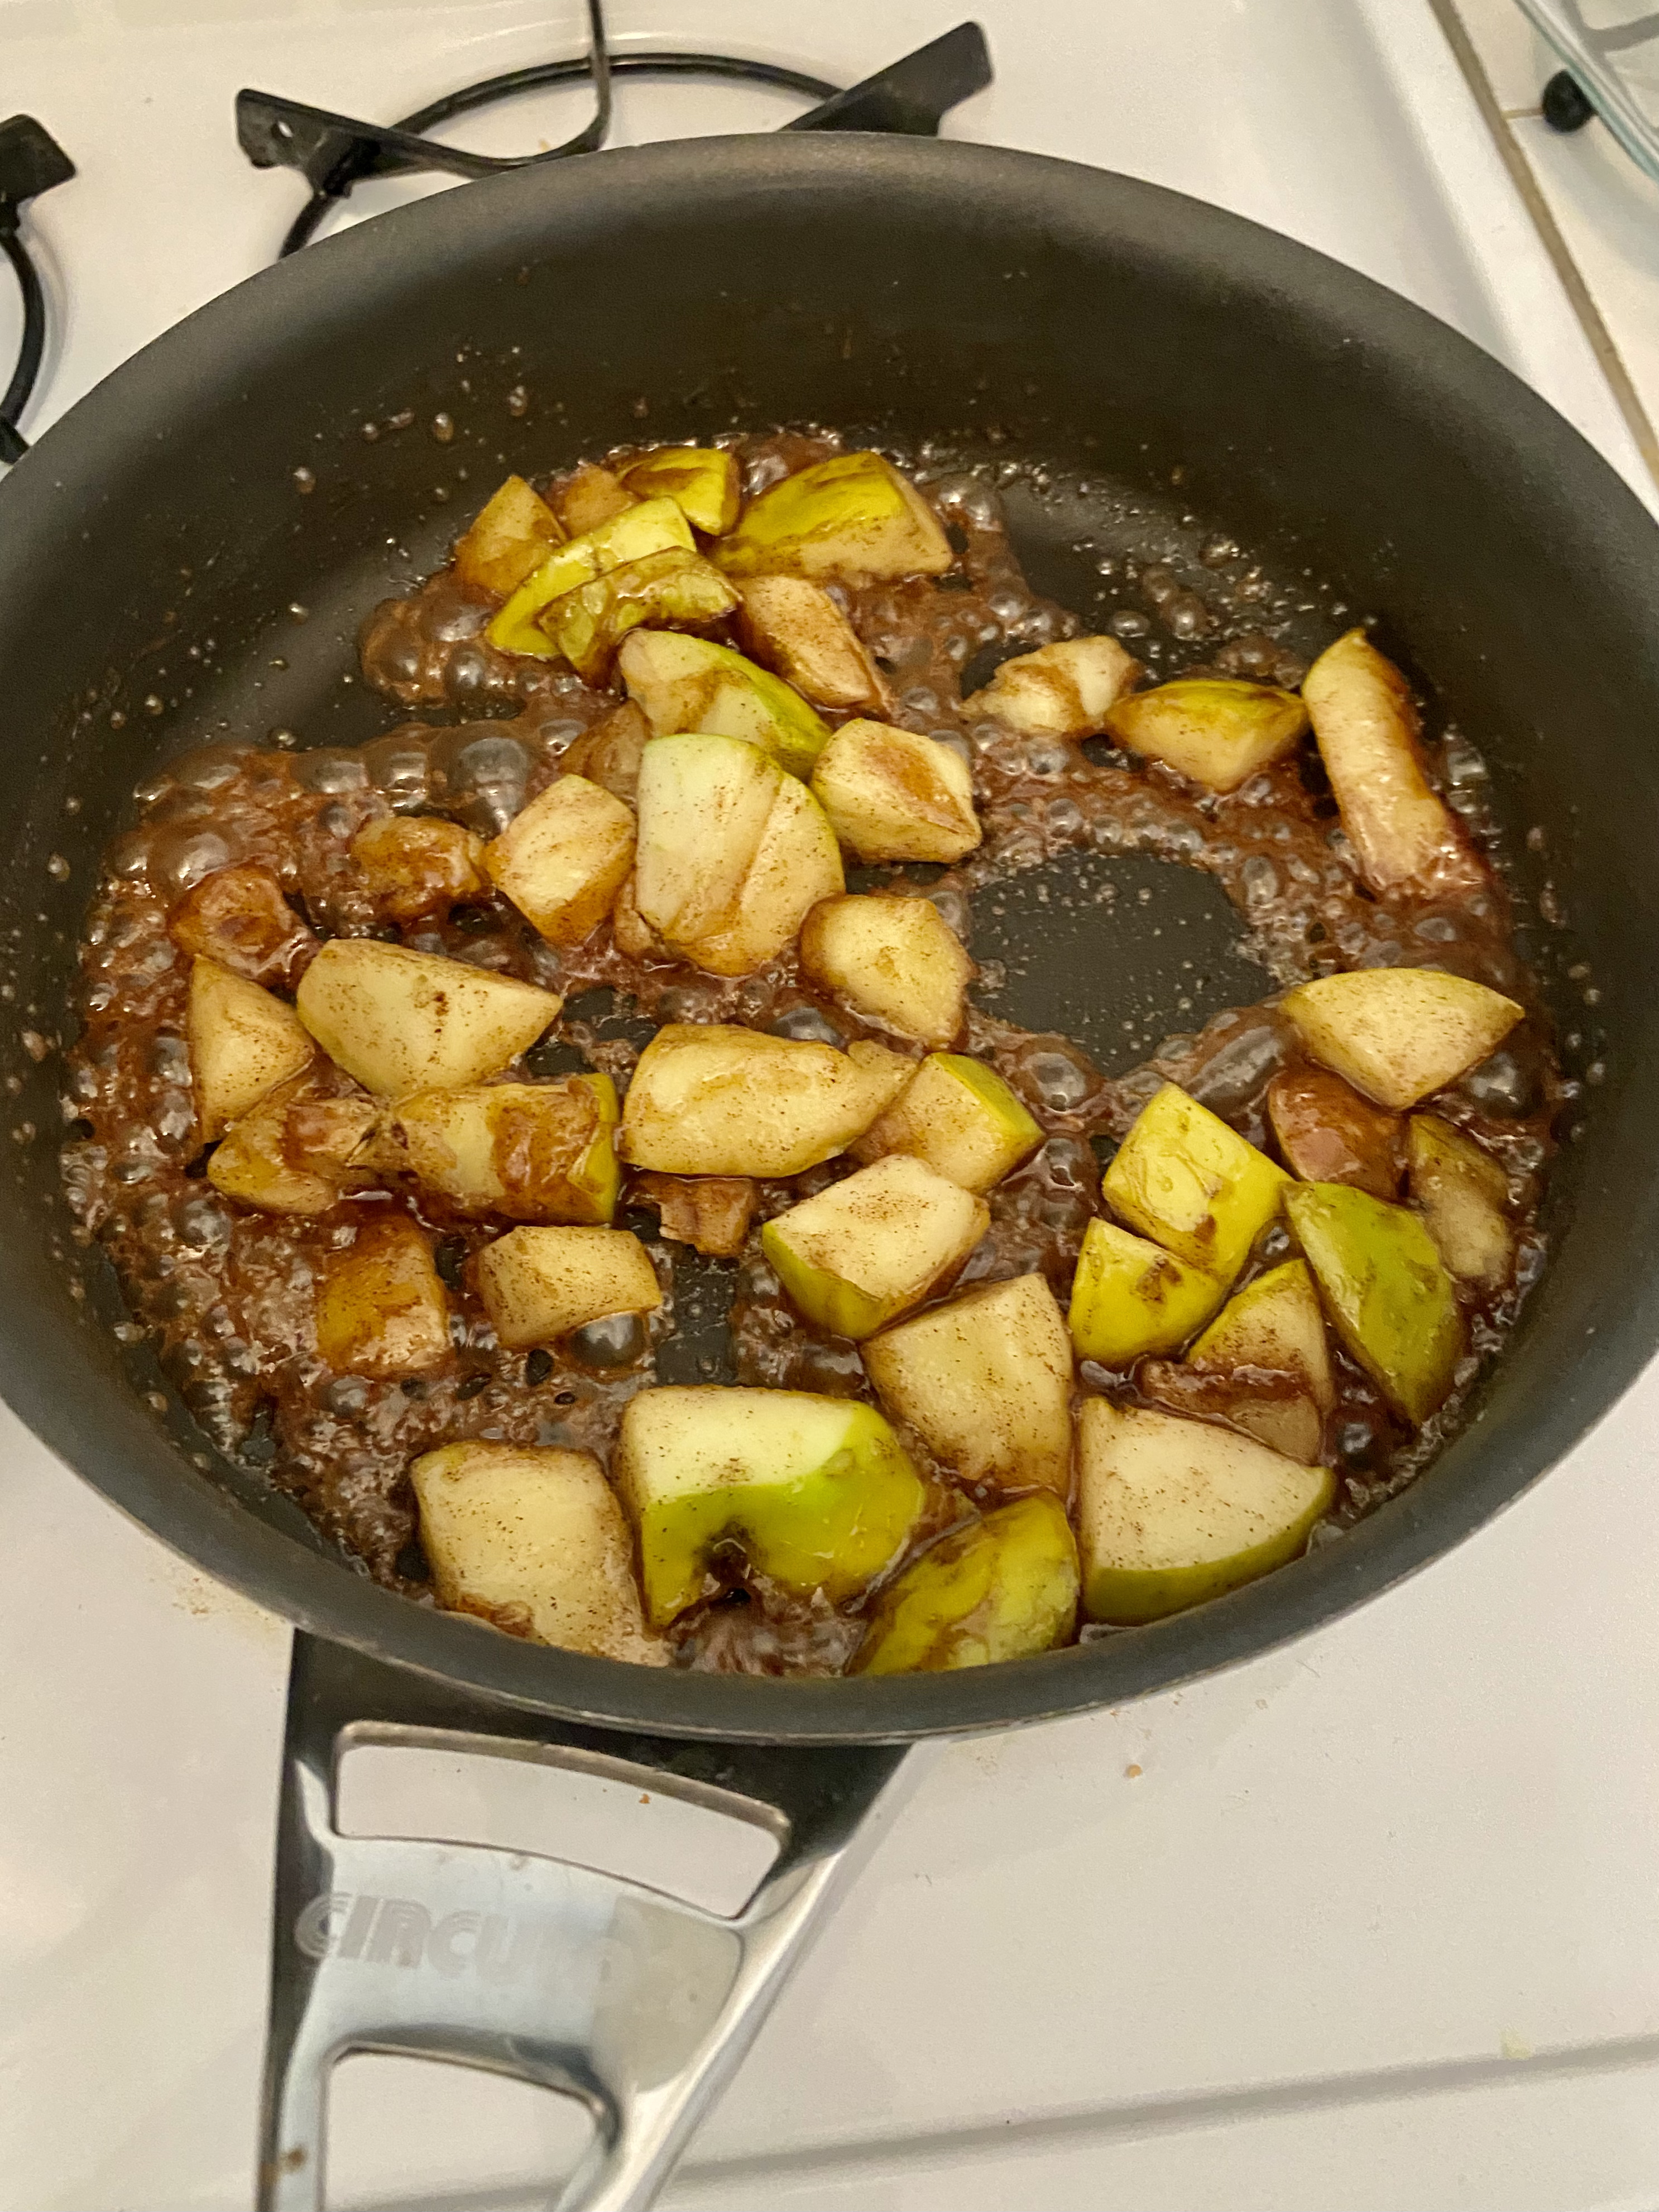
  1. Set a medium skillet over medium-high heat. Melt the butter first, then add your apples, sugar, cinnamon and sea salt
  2. Cook for a few minutes, then push everything around a bit to make sure it cooks evenly. Cook another few minutes or so. Your syrup is done when the apples are soft with browned edges and there’s a golden brown syrup in the pan

Top your waffles with syrup, and dig in!

Apple Pie Cookies

I know this is a contentious thing to say on a baking blog, but it needs to be said: I really don’t like pie.

I don’t know what to tell you. The heavy crust and frequently-too-sweet fillings just don’t do it for me. I’ll take a fruit-filled crisp or cake over pie, any day of the week.

But cookies inspired by pie? Yes please, gimme, sign me up.

IMG_5991

These Apple Pie Cookies caught my eye a long time ago and I finally got around to making them this week. What a winner! The base cookie is similar to a snickerdoodle with a cinnamon sugar topping. And then you cook down some spiced apples, and stuff them right inside the cookie. In every bite, you get a bit of crisp cookie shell, a bit of spiced apple and a chewy hit of cookie. As my coworker put it: “It’s like pie, but with a better ratio of crust to filling.”

They’re also more portable than pie, though you’ll want to make sure to carry these babies right-side-up in a sturdy container. Since they have fruit in the middle, they don’t hold their shape as well as some other cookies, and might fall apart in transit if you put them on their sides.

These do take a fair amount of time since you need to prep apples, let your filling cool and go through assembly. I promise they’re worth it!

Apple Pie Cookies

Original recipe: Cookie Dough and Oven Mitt. I’ve rewritten things a bit and added commentary. 

Yield: ~20 cookies

Suggested equipment: Mixer

Total Time: ~2 hours

Cook Time: ~16 minutes

Ingredients

Apple pie filling 

  • 1 3/4 cups apples—peeled, cored and diced. This takes about 2 medium apples.
  • 3 tbsp light brown sugar, tightly packed
  • 1/2 tbsp flour
  • 1 tsp cinnamon
  • 1 tbsp unsalted butter

Cookies

  • 1/2 cup butter, at room temp
  • 1/2 cup shortening
  • 1 cup sugar
  • 1/2 cup light brown sugar, tightly packed
  • 2 large eggs
  • 1 tsp vanilla extract
  • 2 3/4 cups flour
  • 1 1/2 tsp baking powder
  • 1/4 tsp salt

Coating 

  • 1/2 tbsp cinnamon
  • 1/2 cup sugar

Instructions

Make your filling

  1. Add all your filling ingredients to a medium saucepan (apples, brown sugar, flour, cinnamon and butter). Stir to combine.
  2. Crank the heat up to medium, and let your pan come to a simmer. Simmer for about 3-4 minutes, stirring continuously. You’re good to go when your apples are soft, with a thick syrup around them.
  3. Take your pan off the heat and let your filling cool for a while. You don’t want to stuff hot filling into cookies since the heat could affect your cookie dough. My filling took about 20 minutes to cool, but definitely keep an eye on yours to make sure it’s right before you move onto the next step.

Make your dough

  1. Preheat your oven to 350F
  2. Use your mixer to cream the butter and shortening together. On medium speed, mix until the two are combined.
  3. Add granulated sugar and brown sugar, then mix on medium until it’s light and fluffy.
  4. Add the vanilla and one of your eggs. Mix the egg in completely, then add your second egg and mix it all again.
  5. Put your flour, baking powder and salt into the mixer bowl. Mix it on low until the flour starts to get incorporated into your wet ingredients. Then, turn up the speed to medium and make sure everything is completely combined.

Fill, roll and bake 

  1. First, make your cinnamon sugar topping. In a shallow bowl, stir the sugar and cinnamon until they’re completely combined.
  2. Scoop some dough from your mixer bowl—I used a couple tablespoons of dough per cookie. Smush the dough a bit so it’s easier to stuff.
  3. Put about 1/4 a teaspoon of filling in the center of your dough, and roll the dough back into a circle. You might want to play around with your filling ratio until it feels right, since it depends a bit on how big you make your cookies.
  4. Roll the dough ball in your cinnamon sugar so it’s completely covered in the topping.
  5. Line a baking sheet with parchment. Leave at least an inch between your dough balls so they have space to spread—these will spread quite a bit during baking!
  6. Bake your cookies 12-16 minutes. Mine took the full 16 minutes. Your edges should look set, but the centers will still look a little soft and will firm up as the cookies cool.
  7. Let the cookies cool on a wire rack, then move them into an airtight container for storage.


Caramel Apple Butter Snickerdoodles

I first made apple butter snickerdoodles in the fall of 2014. I liked them so much, I made them again a couple weeks later for a fall-themed potluck. And then…they fell victim to my tendency to try new recipes. I thought about them every fall, but always ended up making something new instead.

IMG_5836

This year, I decided it was time to change that. But I also had a new idea: what if I mixed caramel bits into the batter? Caramel apple is such a classic flavor, after all. I’d never mixed caramel and apple butter together before, but I had a feeling it’d be great.

It turns out caramel bits were a really good idea. They add another layer of flavor to an already great cookie, taking it up just one more notch. The base of this apple butter snickerdoodle is pure delight. It’s a cakey cookie, with a subtle apple flavor. You mix apple butter right into the dough, then mix in the caramel bits, and roll the cookies in a cinnamon sugar mix before you bake them. That adds up to a delicious pillows of apple butter goodness, with a hint of cinnamon and a bit of chewy caramel.

Make sure to allow time to chill this dough so it doesn’t spread during baking. These cookies stay fresh for a few days in an airtight container, and freeze nicely too.

Caramel Apple Butter Snickerdoodles

Original recipe: Crazy for Crust. I modified it and rewrote things a bit. 

Yield: 36 cookies

Suggested equipment: Mixer

Total Time: ~4.5 hours (including chill time)

Cook Time: 14 minutes

Ingredients

For your dough 

  • 3 cups flour
  • 2 tsp baking powder
  • 1/4 tsp salt
  • 3/4 cup butter, softened
  • 1 1/4 cup granulated sugar
  • 2 large eggs
  • 1 tbsp vanilla extract
  • 1/2 tsp cinnamon
  • 1/2 cup apple butter (any brand will do!)

For your cinnamon sugar

  • 1/3 cup granulated sugar
  • 1 tsp cinnamon

Directions

Make your dough 

  1. Whisk the flour, baking powder and salt in a medium bowl
  2. Using your mixer, cream butter and 1 1/4 cups sugar until fluffy
  3. Mix in your eggs, vanilla, 1/2 tsp cinnamon and the apple butter. Beat until it’s just mixed
  4. Add in your flour mixture, and mix the whole thing until it’s blended together
  5. Throw your dough in the fridge to chill for at least 4 hours. This keeps your cookies from spreading, so you don’t want to skip this step!

Bake your cookies 

  1. Preheat your oven to 350F and line cookie sheets
  2. Mix 1/3 cup sugar and 1 tsp cinnamon in a small bowl so it’s fully combined
  3. Scoop a ball of dough, roll it in the cinnamon sugar and place it on your baking sheet. Repeat until you’re out of dough!
  4. Bake your cookies 12-14 minutes. Mine were perfect at 14 minutes, but make a call depending on how you like your cookies
  5. Let the cookies cool for a few minutes on the cookie sheets, then move them to a wire rack to cool completely
  6. Store the cookies in an airtight container at room temp, or freeze for later


Web-Hopping vol. 26

It’s been a while since I did a web-hopping post! That doesn’t mean my actual web-hopping stopped, though. I add dozens of recipes to my “must bake” list every week. Right now, I’m all about fall flavors. From pumpkin to zucchini—I’ll take them all.

Apples are particularly top of mind for me this week, because friends are starting to post their apple picking pictures. I love apple picking, and used to go every year when I lived in the midwest. It’s a tad harder when you live in San Francisco and don’t own a car…but I’m sure I can make it happen!

In the meantime, I plan on scooping up tons of apples from my local markets. Here are the six apple recipes I’m most excited to try this year, and few old favorites.

caramelized-apple-cheddar-cheese-soft-pretzels-with-apple-cider-dipping-sauce-fg-7

Pretzels from Baked by Rachel

Apple and cheddar soft pretzels: I’ll be honest: I get lazy about making yeasted recipes. But these have been on my list for years (literally) and maybe this will be the year I finally make them happen!

Caramel apple shortbread bars: I mean, what’s not to like? A buttery cookie-like base, topped by the classic combo of caramel and apple.

Apple cinnamon zucchini muffins: Zucchini makes for moist, flavorful baked goods so it’s the perfect solve for muffins—which are often too dry for my taste. And in this recipe, chunks of apple take things to an even better place.


apple-pie-stuffed-snickerdoodles-us-of-cookies-cookie-dough-and-oven-mitt-600x806

Snickerdoodles from Bob’s Red Mill

Apple pie-stuffed snickerdoodles: I mean: just look at that picture. You cook up apples like you’re gonna throw them in a pie…but instead, you throw them in the middle of snickerdoodles. And you all know how much I love a good stuffed cookie!

Apple shortcake with honey, cinnamon and lavender: Naturally, I’m intrigued by the lavender in here. I can’t quite imagine how it will taste…which makes the recipe super compelling! (Warning: this recipe is in Hebrew. If I ever make it, I’ll report back on whether translating the page works out!!!)

Ginger apple molasses cake: I’m a sucker for anything ginger or molasses, so clearly this is a must-make. I also love that it has mascarpone frosting!

And just in case you’re craving more: here’s a handy roundup of apple recipes I’ve shared with you in the past.

Oatmeal Peanut Butter Apple Cookies

There are only two ways I’ll eat green apples: baked into something delicious, or smothered in peanut butter. This recipe checks both boxes in one delightful cookie.

img_2179-1These cookies have an oatmeal peanut butter base that’s nutty and satisfying. You mix in little chunks of apple, which soften up in the oven. Cinnamon and allspice add the perfect hint of spice, a bit like what you’d find in apple pie. It’s a sweet, nutty, hearty combination, with a complementary mix of flavors in every bite. I picked this recipe to use up the last of my giant bag of Granny Smiths. Now that I’ve tried these cookies, though, I think the reverse is going to happen: I’ll start buying green apples just to make another batch of Oatmeal Peanut Butter Apple Cookies

Since these cookies use fresh apple, they’re best eaten the day you make them. The apples get mushy over time and make your cookies a bit mushy. These still got rave reviews for flavor on Day 2, but the texture was much better on Day 1. By the time I put these out for the lunch crowd at my office, they’d already lost their shape and were falling into soggy pieces. Very delicious, very peanut buttery pieces.

Oatmeal Peanut Butter Apple Cookies

Original recipe: Two Peas and their Pod. I’ve rewritten things a bit and added commentary. 

Yield: 20 cookies

Suggested equipment: Mixer

Total Time: 35 minutes

Cook Time: 11 minutes 

Ingredients

  • 1/2 cup all purpose flour
  • 1/2 tsp baking soda
  • 1/2 tsp ground cinnamon
  • 1/4 tsp ground allspice
  • 1/4 tsp salt
  • 1/2 cup unsalted butter, at room temperature
  • 1/2 cup granulated sugar
  • 1/2 cup light brown sugar
  • 1/2 cup creamy peanut butter
  • 1 large egg
  • 1 tsp vanilla extract
  • 1 1/2 cups old-fashioned oats
  • 1 cup diced apple, peeled

Step by Step Directions

  1. Preheat your oven to 350F
  2. In a medium bowl, whisk together your flour, baking soda, cinnamon, allspice and salt
  3. Use your mixer to beat the butter, sugar and brown sugar together until it’s smooth and creamy
  4. Add in your peanut butter and mix it all again until it’s smooth
  5. Add your egg and vanilla, then mix the dough again
  6. Turn your mixer to “low” and add in the flour mixture bit by bit. Mix until it’s just combined
  7. Stir in your oats and apples by hand with a spoon
  8. Roll the dough into tablespoon sized balls and place them on a lined cookie sheet. Make sure to bake the dough right away–if you let it sit out, it will get really runny because the apples add moisture!
  9. Bake the cookies 11-12 minutes, or until light and golden brown around the edges
  10. Let the cookies cool on the sheet for 2 minutes, then transfer to a wire rack to cool completely. Make sure they’re actually, really, truly cool before you try moving them again… or else they will fall apart.

Apple Cinnamon Crumb Muffins

I don’t make enough breakfast treats. It’s just sort of hard to pull off these days. My current apartment is too small to host the seated breakfasts and brunch potlucks of yesteryear. And getting up to bake before work is… hard.

img_2010

But!  A couple of weeks ago, I did it! I woke up early on a Monday and baked these Apple Cinnamon Crumb Muffins to share with coworkers. I had a string of morning meetings that day, and thought muffins would add a nice touch. Because obviously, meetings are better with muffins.

I found this recipe when I was digging around for ways to use up a bag of Granny Smith apples. I don’t like eating Granny Smiths on their own so when I have them, they’re destined for baked goods. This was a good recipe pick, for sure. The muffins use a mix of whole wheat and all-purpose flour, and buttermilk helps give the batter some depth. You can mix in apple variety you have on hand. The muffins are finished with a delightful cinnamon crumb topping, adding just the right dose of sugar to complement the whole-wheat-ish base. I don’t typically stock whole wheat flour in my pantry, so I had to buy some for this recipe. Fear not: I already know what I’m going to do with the rest of the bag.

My coworkers seemed to agree that morning meetings are better with muffins, so I’ll definitely try the wake-up-to-bake routine again soon!

Apple Cinnamon Crumb Muffins

Original recipe: Two Peas and their Pod. I’ve rewritten things a bit and added commentary. 

Yield: 24 muffins 

Equipment, pans, etc: Muffin tin 

Total Time: ~45 minutes 

Cook Time: 15-20 minutes

Ingredients

Muffin batter

  • 1 1/4 cups whole wheat flour
  • 1 cup all-purpose flour
  • 3/4 cup light brown sugar
  • 1 tsp baking soda
  • 1/2 tsp salt
  • 1 tsp cinnamon
  • 1/4 tsp allspice
  • 1 cup buttermilk (you can use powdered buttermilk instead of liquid buttermilk. If you do, follow your container’s instructions for the right ratio of powder to water) 
  • 1/4 cup canola oil
  • 1 large egg
  • 1 tsp vanilla extract
  • 2 cups diced, peeled apples (I bought Granny Smith, but any tart apple would do) 

Topping

  • 1/2 cup light brown sugar
  • 1/3 cup all-purpose flour
  • 1 tsp cinnamon
  • 3 tbsp melted butter

Step by Step Directions

  1. Preheat your oven to 375F
  2. Line a muffin pan with paper liners (or you can use nonstick spray!)
  3. In a large bowl, whisk your whole wheat flour, all-purpose flour, brown sugar, baking soda, salt, cinnamon and allspice. (If you’re using powdered buttermilk instead of liquid buttermilk, make sure to add your buttermilk powder during this step, too)
  4. In a small bowl, whisk your buttermilk, oil, egg and vanilla. (If you’re using powdered buttermilk, now is when you’ll add the water portion!)
  5. Pour your wet ingredients into the dry ingredients, and mix with a wooden spoon or spatula just until it’s combined. You don’t want to see any powder specks, but don’t overmix, either!
  6. Gently stir in the apples
  7. To make your crumb topping, combine the brown sugar, flour, cinnamon and melted butter in a small bowl. Mix with a spoon just until it’s crumbly–if you overmix it will turn into big clumps
  8. Pour batter into each muffin cup so they’re 3/4 full
  9. Sprinkle some crumb topping into each muffin cup
  10. Bake your muffins for about 15-20 muffins (mine took 15). The muffins should be golden in color, and a toothpick should come out clean
  11. Let muffins cool in your tin for a few minutes, then transfer them to a wire cooling rack to cool completely


Web-hopping vol. 24

It’s been a while since I wrote a Web-hopping post, but that doesn’t mean I’ve stopped adding to my recipe lists! I’m always scheming about baking experiments and I save new recipes pretty much daily. So many recipes, never enough time!

To reintroduce Web-hopping, let’s talk about my favorite baking season: fall. The apples! The pumpkins! The squash! It’s enough to get this baker giddy. In fact, I’ve already started amassing tons of recipes on a dedicated Pinterest board.

As a kid growing up in southern California, “fall” was more of a concept than a reality. It wasn’t until I moved to the Midwest that I truly understood the crisp feel of a fall day, the comfort of warm cider, the seasonal menus. Now that I’m back in California, fall is the season I miss most. Any time we have a crisp San Francisco morning, I flash back to my years in the Midwest and wish I could head down to the farmer’s market for some fresh pumpkin butter, hot cider and apples galore.

Even if I can’t have fall weather, I can certainly have fall flavors. Here are some of the frontrunners for my fall baking season:

14984296904_c1e882c6e4_c

Apple Cinnamon Streusel Pull-Apart Bread from Girl Versus Dough

Apple Cinnamon Streusel Pull-Apart Bread: I love cinnamon streusel and I love soft, pillowy breads – so this recipe looks like a winner! I think I’ll bring this to work on a Monday, to make Monday morning just a little sweeter.

Pumpkin Cinnamon Rolls with Salted Caramel Icing: These make me nostalgic for the brunch potlucks I used to host when I lived in Chicago. Sadly I don’t have the space to host friends for brunch anymore, but maybe I can convince a friend to host and bring all the goodies! I love this combo of pumpkin and caramel, and think the salted icing will add a special touch.

Roasted Butternut Squash Cornbread: Butternut squash adds a really unique flavor to baked goods. I’ve made butternut squash cupcakes in the past that were a huge hit. This year I want to incorporate squash into more types of treats, and this cornbread looks like a good place to start.

Apple Blondies: I’m digging the idea of apple chunks in a blondie. These look delightful, and they’re on my radar for fall party treats.

pumpkin-brookies-4-of-6-640x959

Pumpkin Brookies from Crazy for Crust

Pumpkin Brookies: I adore a good combo dessert, and I’m really excited about this one! The bottom layer is a pumpkin blondie and the top layer is a brownie. TBD when I make these, but they’re definitely popping up in my kitchen at some point this fall!

Baked Apple Cake with Cinnamon Frosting: This recipe is written in German – but Google Translate can come to our rescue! I’ve made some apple cakes in the past and love how chunks of apple nestle into soft cake layers. This recipe looks especially delicious thanks to its cinnamon frosting.

Bonus round! Here are a few of my favorite fall-tinged recipes from previous years:

Apple Crisp

Birthday cakes are a big deal in my family. Every year my mom makes us the same birthday cake from scratch. It’s been a tradition since I can remember and something I look forward to every year. Because of that, I love baking cakes for other people, too. So for my boyfriend’s birthday, I offered to make him any layer cake he chose. Would it be Peanut Butter Chocolate? Chocolate Strawberry Pistachio? Cinnamon Snickerdoodle?

Imagine my shock when he requested a fruit crisp instead! I was surprised he’d rather have a crisp. But I’m not a selfish baker- so I happily obliged.

20151115_221254

We ended up abandoning our ice cream topper, but i do recommend this recipe a la mode! 

Actually, this specific crisp recipe is also a family tradition: my mom makes it every Thanksgiving. She was talking about it when she visited San Francisco a bit ago, and my boyfriend latched onto the idea of this crisp as his Dream Dessert. How could I not make those sugary dreams come true?!

This recipe comes from a cookbook series written by Abby Mandel called Cuisinart Classroom. The series encompasses volumes for things like dessert, breads, sauces, etc. A lot of my mom’s perennial baking recipes come from this series, so she bought me a copy when I struck out on my own after college. The whole series of cookbooks assumes you’re using a food processor for everything- to the point that some steps are “assigned” to a processor almost as a matter of principle. I think a lot of the recipes could be made with simpler tools instead, and this recipe certainly falls into that category, so don’t worry if you lack a food processor.

20151115_220730

The finished crisp

My boyfriend’s birthday was a while ago but because of timing, we just had the crisp earlier this week. We agreed that I’ll be tasked with coming up with creative crisp ideas for his birthday every year. So readers- got any good crisp recipes to send my way?


Apple Crisp 

Source: Abby Mandel’s Cuisinart Classroom (Dessert and Sauces volume)

Yield:  one 11-inch round crisp (my dish is actually only 9-inches so I had leftover apples and topping. Was bummed to toss the topping, but will confess I ate the sugary apples on their own as a treat the next day!) 

Suggested equipment: the recipe assumes you are going to use a food processor, but you really don’t need it (sh- don’t tell Abby Mandel I said that!)

Total Time: ~70 minutes 

Cook Time: ~50 minutes 

I broke the original recipe into a few more detailed steps and wrote my own commentary below. I also omitted the nuts when I made it, but include the option for nuts below. 

Ingredients

  • 5 large tart apples (I used Granny Smith)
  • 1/2 cup sugar
  • 1 teaspoon and 1 teaspoon cinnamon, divided (you use 1 teaspoon at 2 separate points in the recipe) 
  • 1/2 teaspoon and 1/2 teaspoon nutmeg, divided (you use 1/2 teaspoon at 2 separate points in the recipe) 
  • 1 teaspoon lemon juice- only if you think your apples are really sweet (if you’re using tart apples like I did, this likely won’t be an issue, and I didn’t use lemon juice) 
  • 1/2 cup walnuts or pecan halves
  • 3/4 cups unbleached all-purpose flour
  • 1/4 teaspoon salt
  • 3/4 cup dark brown sugar, firmly packed
  • 1 stick unsalted butter, chilled and quartered (chilling is key here for texture reasons so don’t ignore this!)
  • 1/4 cup rolled oats or wheat germ (I used oats) 

Step by Step Directions

Get prepped to bake 

  1. Move your oven rack to the middle rung
  2. Pre-heat the oven to 350F
  3. Butter an 9 or 11-inch pie plate, or 2-quart souffle dish
  4. Insert the “medium slicing disc” into your food processor

Prep your apple filling 

  1. Peel, core and half your apples
  2. Feed the apples into your processor’s feed tube to slice them up (see- you could totally do this without a processor, but I’m humoring Abby here!)
  3. Transfer apples to a large bowl
  4. Add the white sugar, 1 tsp cinnamon, 1/2 tsp of nutmeg and mix in with the apples  (and the lemon juice if you’re using it- I didn’t) 
  5. Arrange the apples in the bottom of your baking dish

Prep your topping 

  1. Change your processor’s blade to the “metal blade”
  2. If you’re using nuts: now is the time to chop them up! Pulse your processor to chop them coarsely
  3. Add the flour, salt, brown sugar, remaining cinnamon, remaining nutmeg, oats and butter to the processor bowl
  4. Pulse the machine on and off until the ingredients are mixed and the butter pieces are about the size of a small pea- took me a little longer than the 20 seconds suggested in the original recipe

Bake your crisp 

  1. Spreading the crumbly topping over your prepared apples, making sure to cover the edges
  2. Bake the crisp for about an hour- I’d start checking around 45 minutes to see how it’s faring. Mine took about 55 minutes to bake evenly, but my oven’s temp had dropped over the course of baking
  3. When it’s done, it will look brown and crispy
  4. Serve warm for happiest results. We ditched the ice cream this time, but my mom usually serves this a la mode!


Olive Oil Apple Honey Cake

When I mention olive oil, you’re probably more likely to think about cooking than baking. I am here today, dear friends, to change that. Olive oil is truly great in baked goods, as a substitute for other fats, for dairy, or just to add some extra texture and nuance flavor. I see it used most frequently as an ingredient in cakes, where it adds a simple richness and a bit more moisture to the batter. I’ve also used it in brownies, where it added a nice depth to the flavor. You can’t quite pinpoint the source of this flavor in the finished baked good- it doesn’t taste like olives, oil, or olive oil. So it’s one of those wonder ingredients that imparts great benefits without adding complexity. A Secret Weapon, if you will.

I recently felt inspired to make an apple-based recipe and turned to the Interwebs for ideas. I’ve made a slew of apple recipes in the past, from Salted Caramel Apple Crumb Bars to Roasted Apple Spice Cake. I wanted to make a cake this time too, but had an important ingredient restriction: I couldn’t use any dairy. This cake was destined for a potluck, you see, and some of the guests couldn’t eat dairy. So to Google I turned, and behold: I came upon this fabulous recipe for Olive Oil Apple Honey Cake.

In this recipe, olive oil takes the place of any other sort of fat or dairy product. It makes for a somewhat custardy cake texture, moist and flavorful. The honey brings a tad of sweetness both within the batter, and in the topping layer. And then the apples bake nicely to be little bits of tasty fruit within the cake. There’s a “topping” of eggs and honey that adds a nice crackle and a bit more sweetness to your first bites.

The source blogger who posted this laid out her apples into a most-beautiful bottom layer that looks like a flower. I’ll admit mine was much less artistic- but it still tasted great!

Olive Oil Apple Honey Cake

My finished cake

My finished cake

Source: A Pickled Plum 

Yield: One 8-inch cake

Suggested equipment: Nothing- you can hand-mix this

Total Time: ~1 hour 

Cook Time: ~45 minutes 

I broke the original recipe into a few more detailed steps and wrote my own commentary below but the ingredients/process come straight from A Pickled Plum. 

Ingredients

Batter 

  • 4 red apples, peeled, cored and thinly sliced (I used a mix of Honeycrisp and Gala)
  • 5 tbsp all-purpose flour, sifted
  • 5 tbsp granulated sugar
  • 1 tsp baking powder
  • 5 tbsp extra virgin olive oil
  • 2 large eggs

Topping

  • 2 eggs
  • ⅔ cup (150ml) honey

Step by Step Directions

Prep your apples

  1. Peel and core your apples, then cut them into thin slices. This sort of stuff always takes me longer than I think it should, which is why it’s important to factor in the apple prep time when you’re planning your prep logistics. 

Bake your cake 

  1. Pre-heat your oven to 350Fº
  2. Grease and line a 8-inch cake pan with parchment paper, then grease it with non-stick spray
  3. Place the apple slices into the pan. Mine were placed rather haphazardly but you’re welcome to make it prettier!
  4. Put flour, sugar, baking powder, olive oil and 2 eggs into a bowl, then whisk until smooth
  5. Pour batter over the apples in the pan and bake for 20 minutes

Add your topping 

  1. After removing the pan from the oven, increase the temperature to 400Fº
  2. In a bowl, whisk 2 eggs and the honey
  3. Pour the honey mixture over the cake, then bake it for another 15-25 minutes until it is golden brown and a fork comes out clean when poked in the center. I had to bake mine for 25 minutes to get the top to brown evenly- I suggest you check on yours after about 15 minutes to see whether it needs more time or not 

My dinner hosts served my cake cold topped with non-dairy ice cream, which was the perfect complement to a simple but delicious cake.